
Docker for Devs - Workshop
Goal of the Workshop
The workshop is going to show how simple it is to use Docker and why it is worth a thought to implement it into your development workflow.
The second topic is how to compose containers with docker-compose to gain an understanding how everything can play together for, e.g., quick development environments.
Heads up - "Glossary"
- TASK: Is a refer to a task in the workshop repository.
- WDWD: Stands for "What does what do" aka "Me explaining what the things listed below do" (short forms FTW!). I only explain new things in these sections.
- Code blocks: Mostly contain an useful tip or expected command output.
Group "Partition Schema"
Two groups ore more should be good. Per group at least two or more people. Every group works on their own Docker containers adventure. If there are people that aren't as "advanced", they can play around with Docker Swarm (No tutorial provided in this post!).
README
RATM before asking, thanks!
("Read & Apply the Manual")
If you don't know any further, add --help to the command, to get a help text/page that should guide you to your goal or use man command to show the man(ual) page for the given command.
If you can't solve a problem feel free to ask.
Intro: Container and Microservices
Why do people like the Docker-"Principle"?
The Docker-"Principle" is simpleness. Making it as simple as possible to for example starting a WordPress instance with database server with only two commands (or one command using docker-compose).
Simpleness that almost everybody, with a little knowledge about using a shell or cmd, could do it. That's what makes Docker great and bad again, because there are a lot of people that have little to no knowledge about "basic" troubleshooting. I had open issues, because of people A) not RTFM, B) No knowledge about how to troubleshoot problems on their own first.
Overall Docker is an awesome tool, that is more and more growing with each release and with all the awesome open source applications for Docker like Kubernetes, Nomad, and many more.
Micro-what? Microservices!
Microservices are small gears, like a MySQL database, NoSQL database, Redis, etc., for a big application like Redmine, GitLab, etc. They allow you to test local in a small scale and then scale with your load (if done right).
Container?!
The container world on the Linux side is huge, the Windows side has started to grow but is still quite uncommon, unless for specific use cases. Every container runs in it's own (kernel) namespace. For this we need to understand how namespaces work. A namespace is a separated "branch", where processes, mounts, etc. can exist without disturbing other processes, mounts, etc. in other namespaces.
An advantage of namespaces is, that you can limit the cpu, memory, network, etc. for them. For example, a process that goes rogue, can be limited to specific resource limits.
This diagram should make it clear, how namespaces can create "unlimited" separated and isolated container environments.
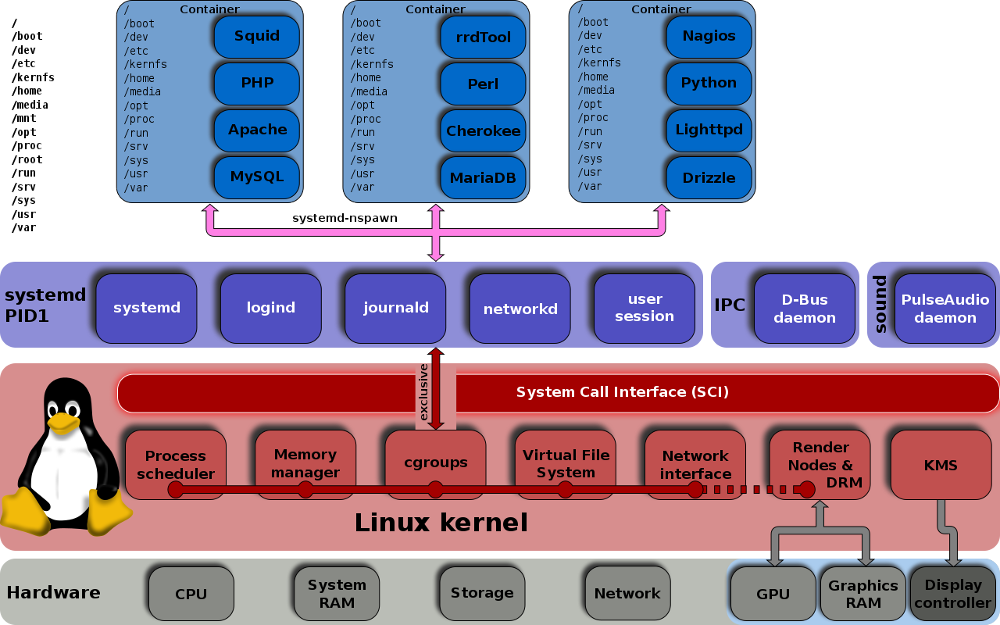
This photo (original) is made by Shmuel Csaba Otto Traian, licensed under the CC Attribution-Share Alike 3.0 Unported license.
Docker and most other containers utilities not only use namespaces to separate containers from each other. There are several other techniques, that further improve security.
A container uses the existing Linux kernel, there are less resources used, because a container just uses the existing kernel processes and doesn't need to spawn them like when using a virtual machine.
Why is it a good idea to use separate namespaces for networked applications? Because if someone breaches for example your webserver, he is just in the container and not on the host server. If you'll then detect the breach, you just stop the container and would restart it with an updated image version that contains the latest webserver software.
TL;DR A container is NOT a VM. A container is a "separate" Linux system, that runs in an isolated namespaced environment of the running kernel on the running kernel.
Prepare for the Docker Madness
System "Requirements" and Installation
Insert "The System Requirements are too damn high" Meme here
Nope, they're not!
Linux User?
- A working Linux distro
- Linux Kernel 4.x or higher ("included" in the Virtualbox)
You can run Docker under any kernel 3.16+, but I recommend you to use the latest kernel for the implemented improvements in some of the file system and network systems Docker uses.
Docker Engine Installation
To install the Docker Engine run the command (for production machines it is recommended to not just curl and pipe a script into shell like here ;-)):
curl -sSL https://get.docker.com/ | sh
For a more details about the installation of the Docker Engine, see the Linux installation docs or the Windows installation docs.
When talking about Docker, we almost always talk about the Docker Engine. Because the Docker Engine is, as the name implies, the engine for the containers.
After you have installed it without any errors popping up, you have to start the Docker Engine. When your distribution is using systemd:
systemctl enable docker.service
systemctl start docker.service
On distribution without systemd:
/etc/init.d/docker start
# or
service docker start
This starts Docker and when using systemd enables the autostart for Docker Engine.
Now that Docker is installed and the Docker dameon should be running, you now have to add your non-root user to the docker group (on most distributions the group is called docker).
To add your user to the docker group, you can run the following command (replace USERNAME with your user's username):
gpasswd -a USERNAME docker
Please relog or restart your machine after you have added yourself to the group.
docker-compose Installation
![]()
docker-compose Logo by Docker
With curl we download the docker-compose binary, then we move docker-compose to your /usr/local/bin that is in your PATH and set the execute permission.
wget -O /usr/local/bin/docker-compose "https://github.com/docker/compose/releases/download/1.8.0/docker-compose-`uname -s`-`uname -m`"
sudo chmod +x /usr/local/bin/docker-compose
For more detailed docker-compose installation docs, see here.
After you have followed the commands above, you can test if you have installed docker-compose successfully by running docker-compose --version.
Windows User?
- Windows 10 or higher
- Ability to install Docker Desktop on your system (Official Docker Desktop system requirements)
Docker Desktop Installation
Please follow the up-to-date instructions from the Docker Desktop for Windows documentation installations steps.
If you are asked to use/enable WSL option, make sure to check that opotion.
wsl --install -d Ubuntu

wsl --set-default Ubuntu
Clone the workshop repo
Clone or Download the Workshop repository from GitHub https://github.com/galexrt/workshop-docker.git. It'll provide all files and tasks used in the Workshop.
git clone https://github.com/galexrt/workshop-docker.git
Or download via this link from GitHub: https://github.com/galexrt/workshop-docker/archive/refs/heads/master.zip
Expected Output
Cloning into 'workshop-docker'...
remote: Enumerating objects: 526, done.
remote: Total 526 (delta 0), reused 0 (delta 0), pack-reused 526 (from 1)
Receiving objects: 100% (526/526), 98.33 KiB | 613.00 KiB/s, done.
Resolving deltas: 100% (152/152), done.
Running your first Docker containers
This will guide you through the commands needed to start your WordPress instance with MySQL database server.
Hello World!
Now to test your Docker installation, we start like when learning a new programming language, with the simplest example. A "Hello World" container. To run the "Hello World" container, you simply run the following command:
docker run hello-world
Example Output
$ docker run hello-world
Unable to find image 'hello-world:latest' locally
latest: Pulling from library/hello-world
c1ec31eb5944: Pull complete
Digest: sha256:91fb4b041da273d5a3273b6d587d62d518300a6ad268b28628f74997b93171b2
Status: Downloaded newer image for hello-world:latest

Hello from Docker!
This message shows that your installation appears to be working correctly.

To generate this message, Docker took the following steps:
1. The Docker client contacted the Docker daemon.
2. The Docker daemon pulled the "hello-world" image from the Docker Hub.
    (amd64)
3. The Docker daemon created a new container from that image which runs the
    executable that produces the output you are currently reading.
4. The Docker daemon streamed that output to the Docker client, which sent it
    to your terminal.

To try something more ambitious, you can run an Ubuntu container with:
$ docker run -it ubuntu bash

Share images, automate workflows, and more with a free Docker ID:
https://hub.docker.com/

For more examples and ideas, visit:
https://docs.docker.com/get-started/
When everything went correct, I can now welcome you to the big World of the containers!
Basic commands you need to know
docker ps- Displays all currently running containers. To display all containers, add the-aoption or use the filter option-f [](can be specified multiple times).docker logs- .docker stop CONTAINER- Sends aSIGTERMsignal to the containers main process. WhereCONTAINERis a container ID or name.docker rm CONTAINER- Deletes a stopped/exited container. WhereCONTAINERis a container ID or name.
One of the most important commands we need is docker run. So we now take a look at it and run:
docker run --help
Expected Output
$ docker run --help
Usage:  docker run [OPTIONS] IMAGE [COMMAND] [ARG...]

Create and run a new container from an image

Aliases:
  docker container run, docker run

Options:
      --add-host list                    Add a custom host-to-IP mapping (host:ip)
      --annotation map                   Add an annotation to the container (passed through to the OCI runtime) (default map[])
  -a, --attach list                      Attach to STDIN, STDOUT or STDERR
      --blkio-weight uint16              Block IO (relative weight), between 10 and 1000, or 0 to disable (default 0)
      --blkio-weight-device list         Block IO weight (relative device weight) (default [])
      --cap-add list                     Add Linux capabilities
      --cap-drop list                    Drop Linux capabilities
      --cgroup-parent string             Optional parent cgroup for the container
      --cgroupns string                  Cgroup namespace to use (host|private)
                                         'host':    Run the container in the Docker host's cgroup namespace
                                         'private': Run the container in its own private cgroup namespace
                                         '':        Use the cgroup namespace as configured by the
                                                    default-cgroupns-mode option on the daemon (default)
      --cidfile string                   Write the container ID to the file
      --cpu-period int                   Limit CPU CFS (Completely Fair Scheduler) period
      --cpu-quota int                    Limit CPU CFS (Completely Fair Scheduler) quota
      --cpu-rt-period int                Limit CPU real-time period in microseconds
      --cpu-rt-runtime int               Limit CPU real-time runtime in microseconds
  -c, --cpu-shares int                   CPU shares (relative weight)
      --cpus decimal                     Number of CPUs
      --cpuset-cpus string               CPUs in which to allow execution (0-3, 0,1)
      --cpuset-mems string               MEMs in which to allow execution (0-3, 0,1)
  -d, --detach                           Run container in background and print container ID
      --detach-keys string               Override the key sequence for detaching a container
      --device list                      Add a host device to the container
      --device-cgroup-rule list          Add a rule to the cgroup allowed devices list
      --device-read-bps list             Limit read rate (bytes per second) from a device (default [])
      --device-read-iops list            Limit read rate (IO per second) from a device (default [])
      --device-write-bps list            Limit write rate (bytes per second) to a device (default [])
      --device-write-iops list           Limit write rate (IO per second) to a device (default [])
      --disable-content-trust            Skip image verification (default true)
      --dns list                         Set custom DNS servers
      --dns-option list                  Set DNS options
      --dns-search list                  Set custom DNS search domains
      --domainname string                Container NIS domain name
      --entrypoint string                Overwrite the default ENTRYPOINT of the image
  -e, --env list                         Set environment variables
      --env-file list                    Read in a file of environment variables
      --expose list                      Expose a port or a range of ports
      --gpus gpu-request                 GPU devices to add to the container ('all' to pass all GPUs)
      --group-add list                   Add additional groups to join
      --health-cmd string                Command to run to check health
      --health-interval duration         Time between running the check (ms|s|m|h) (default 0s)
      --health-retries int               Consecutive failures needed to report unhealthy
      --health-start-interval duration   Time between running the check during the start period (ms|s|m|h) (default 0s)
      --health-start-period duration     Start period for the container to initialize before starting health-retries countdown (ms|s|m|h) (default 0s)
      --health-timeout duration          Maximum time to allow one check to run (ms|s|m|h) (default 0s)
      --help                             Print usage
  -h, --hostname string                  Container host name
      --init                             Run an init inside the container that forwards signals and reaps processes
  -i, --interactive                      Keep STDIN open even if not attached
      --ip string                        IPv4 address (e.g., 172.30.100.104)
      --ip6 string                       IPv6 address (e.g., 2001:db8::33)
      --ipc string                       IPC mode to use
      --isolation string                 Container isolation technology
      --kernel-memory bytes              Kernel memory limit
  -l, --label list                       Set meta data on a container
      --label-file list                  Read in a line delimited file of labels
      --link list                        Add link to another container
      --link-local-ip list               Container IPv4/IPv6 link-local addresses
      --log-driver string                Logging driver for the container
      --log-opt list                     Log driver options
      --mac-address string               Container MAC address (e.g., 92:d0:c6:0a:29:33)
  -m, --memory bytes                     Memory limit
      --memory-reservation bytes         Memory soft limit
      --memory-swap bytes                Swap limit equal to memory plus swap: '-1' to enable unlimited swap
      --memory-swappiness int            Tune container memory swappiness (0 to 100) (default -1)
      --mount mount                      Attach a filesystem mount to the container
      --name string                      Assign a name to the container
      --network network                  Connect a container to a network
      --network-alias list               Add network-scoped alias for the container
      --no-healthcheck                   Disable any container-specified HEALTHCHECK
      --oom-kill-disable                 Disable OOM Killer
      --oom-score-adj int                Tune host's OOM preferences (-1000 to 1000)
      --pid string                       PID namespace to use
      --pids-limit int                   Tune container pids limit (set -1 for unlimited)
      --platform string                  Set platform if server is multi-platform capable
      --privileged                       Give extended privileges to this container
  -p, --publish list                     Publish a container's port(s) to the host
  -P, --publish-all                      Publish all exposed ports to random ports
      --pull string                      Pull image before running ("always", "missing", "never") (default "missing")
  -q, --quiet                            Suppress the pull output
      --read-only                        Mount the container's root filesystem as read only
      --restart string                   Restart policy to apply when a container exits (default "no")
      --rm                               Automatically remove the container when it exits
      --runtime string                   Runtime to use for this container
      --security-opt list                Security Options
      --shm-size bytes                   Size of /dev/shm
      --sig-proxy                        Proxy received signals to the process (default true)
      --stop-signal string               Signal to stop the container
      --stop-timeout int                 Timeout (in seconds) to stop a container
      --storage-opt list                 Storage driver options for the container
      --sysctl map                       Sysctl options (default map[])
      --tmpfs list                       Mount a tmpfs directory
  -t, --tty                              Allocate a pseudo-TTY
      --ulimit ulimit                    Ulimit options (default [])
  -u, --user string                      Username or UID (format: <name|uid>[:<group|gid>])
      --userns string                    User namespace to use
      --uts string                       UTS namespace to use
  -v, --volume list                      Bind mount a volume
      --volume-driver string             Optional volume driver for the container
      --volumes-from list                Mount volumes from the specified container(s)
  -w, --workdir string                   Working directory inside the container
As we can see docker run has a lot of options, to choose from.
In this workshop we are only covering some of basic options, you should know to begin with.
$ docker run --help

Usage:  docker run [OPTIONS] IMAGE [COMMAND] [ARG...]

[...]
WDWD:
[OPTIONS]- Run flags/options.IMAGE- The name of a Docker image.[COMMAND] [ARG ...]- Depending on the images, can be used to provide an alternative command and arguments to pass to the image's entrypoint.
I'm going in depth about image names, command args and entrypoint later on (here).
Starting the MySQL database server
I'm going to use the MySQL Docker image from sameersbn in the workshop. Because this image is more convenient to setup, than the official available MySQL and MariaDB Docker image.
So we specify the IMAGE argument in our command now.
docker run \
    docker.io/library/mysql:latest
Let's give it a name (BTW Can we keep it?)
How about Dogmeat? :D
Our MySQL database server container should have a name, so we don't need to use the randomized name or unique ID.
Every container gets an unique ID and randomized name. We can override the name with the --name NAME option.
Let's name it "database".
Our command now looks like this:
docker run \
    --name mysql \
    docker.io/library/mysql:latest
Giving a container a "simple" name, is important to simplify later processes, like connecting from the WordPress instance to the MySQL database server.
Does the container keep on running or do I need something like screen or what?!
The --detach and --interactive options.
If you now run the command to start the container, upon start you see some log output coming, but should notice that when closing the terminal, the database container immediately gets stopped/exits (To see if the container exited, use docker ps -a).
When you run a container, by default your current stdin and stdout will be attached to the container, making it interactive (If you want an interactive container, you should still add --interactive option). To disable the attachment of stdin and stdout add the --detach (or short -d) option to the command. Using the --detach (or -d) option, runs the container detached.
docker run \
    -d \
    --name mysql \
    docker.io/library/mysql:latest
Running a container detached is most common for containers with server or headless application, like Nginx, MySQL, etc.
Don't forget to delete the exited/stopped MySQL database container with the remove command, docker rm database (where database is the name or ID of the container) else if starting you'll get an error saying that a container already exists with the same name.
In case you already forgot, here's how to delete the container
docker rm NAME
How would one configure the MySQL database server instance?
One big questions will be for you, "How can I configure the MySQL database server?" in the container. You can.. A) use config files or B) use environment variables (portable and the simplest way for most scenarios).
The most portable way is to use environment variables. Most containers that are configured through environment variables, have a script, the entrypoint, that sets config variables and a lot more, before the main application/program is started.
In the case of docker.io/library/mysql:latest the following environment variables are used for basic configuration:
MYSQL_DATABASE- Database to create and gain access to the username given inMYSQL_USERbelow.MYSQL_USER- Database User to create. User will be given access to the database(s) fromMYSQL_DATABASE.MYSQL_PASSWORD- Password for the given database user.
To specify an environment variable, the --env (or -e) option is used.
docker run \
[...]
    -e 'MYSQL_DATABASE=wordpress' \
    -e 'MYSQL_USER=wordpress' \
    -e 'MYSQL_PASSWORD=wordpress' \
[...]
*sarcasm on* 100% secure passwords used here *sarcasm off*
openssl rand -base64 20, can be used to generate a "secure" password.If we run the database with the environment variables added, does it run? Check with docker ps -a.
It exited? Let's check the logs! docker logs mysql.
Does it complain about there being no root password specified for the setup?
Looking at the Docker hub page of the official mysql image, scroll to the "Environment Variables" section (pro tip use CTRL+F to search the page in your browser),
One of the first variables in that list is MYSQL_ROOT_PASSWORD, to quote the documentation:
This variable is mandatory and specifies the password that will be set for the MySQL root superuser account. ...
We need to add that environment to our docker run command as well.
How would you go about adding it to your docker run command?
_FILE to the end of some environment variable and have the container image entrypoint read the file to populate the environment variable(s).For the mysql's image documentation regarding that please checkout the "Docker Secrets" section on the Docker Hub page.How do I save the database outside the container?
You want to save your data outside of the container, for a simple reason: If you stop and delete the container, your data is gone. For this Docker has volumes.
A Volume is like a mount from the host system inside the container.
The volume option is --volume (or -v). The syntax of a volume option is for example:
docker run \
[...]
    -v HOST_PATH:CONTAINER_PATH:MODE
[...]
WDWD:
HOST_PATH- Path to mount from the host system inside the container.CONTAINER_PATH- "Mount" destination path in the container.:MODE- Is optional. Can berw(read-write) orro(read-only). Defaults torw.
NOTE
- If the host path doesn't exist it'll get created.
- The host path can be a file too.
- Docker doesn't distinguish between file or folder. If the path doesn't exist, a directory always get's created.
Running the MySQL database server container
Now we have all components, we need for running the MySQL container.
When we have put everything we learned now together, we should get something that looks like this:
docker run \
    -d \
    --name mysql \
    -e 'MYSQL_DATABASE=wordpress' \
    -e 'MYSQL_USER=wordpress' \
    -e 'MYSQL_PASSWORD=wordpress' \
    -e 'MYSQL_ROOT_PASSWORD=my-scret-pw' \
    -v /opt/docker/wordpress/mysql:/var/lib/mysql \
    docker.io/library/mysql:latest
WDWD:
-d- To run the container detached.--name wordpress- Gives the container the name "wordpress".-e ...=...- Specifies environment variables, that are used for configuration.-v /opt/docker/wordpress/mysql:/var/lib/mysql- Mount/opt/docker/wordpress/mysqldirectory at/var/lib/mysqlinto the container.docker.io/library/mysql:latest- Specifies what image to use.
If you run the run command with the --detach (or -d), it'll just return the unique (long) ID of the container.
With docker logs CONTAINER (where CONTAINER is a container ID or name), you'll get the logs of the first process in the container.
Starting the WordPress instance
So you now already know some "basics", about starting containers. I'm not going in depth with every little thing anymore.
How can the WordPress container and the MySQL container communicate with each other?
In Docker by default all containers can talk to each other, if they know the IP address, that is called short ICC or Inter Container Communication (docker daemon [...] --icc=[true/false]).
To allow the WordPress container to contact the MySQL container, we would need to get the IP address of the MySQL container. You can use the docker inspect CONTAINER_OR_IMAGE (where CONTAINER_OR_IMAGE is the unique ID or name of a container), the command returns JSON formatted output with "all" informations about the given container(s) or image(s).
But to do this everytime the MySQL container get's restarted, is too much work. That's where Docker implements a mechanism called links.
As you might guess, with links, you can "link"/connect containers together. Keep in mind that with the above mentioned Docker daemon option --icc=true all containers can talk to each other, when knowing the IP address of another container.
The link option syntax is like this:
docker run \
[OPTIONS]
    --link=CONTAINER_NAME:LINK_NAME \
[IMAGE]
WDWD:
CONTAINER_NAME- The container to link.LINK_NAME- The name of the "/etc/hosts" entry (aka "fake" DNS record).
If you link the MySQL container to the WordPress container, the WordPress container will get a special entry in it's /etc/hosts about the MySQL container and "inherit" all of the MySQL containers environment variables prefixed with the link name.
For example the link option is --link=mysql:database.
So if we take a look at the /etc/hosts and environment variables inside the WordPress container, with the container link to the MySQL container, it should get much clearer how the "linking works".
To show you the created /etc/hosts entry and the environment variables created inside the container.
I'm running the following command, to just demonstrate it:
docker run \
    -d \
    --name=wordpress \
    --entrypoint=/bin/bash \
    wordpress
cat /etc/hosts
env
exit # To exit the container
docker rm wordpress
WDWD:
--entrypoint=/bin/bash- This overwrites the command executed, when the container is started.
Expected Output
(The output here may looks a bit different, due to small changes to the commands executed in the demo)
The environment variables are created inside the new container only, not in the link source! The container that is used as the link destination is left untouched.
beginning with DATABASE_, allow to get the environment variables and published ports from the linked container very simple.
NOTE
- There can be multiple links with the same name.
- You can't attach two same named links to the destination container (the container you are creating).
How can I reach the WordPress instance from the outside?
To make a port available to the "public", that's why it's called publishing ports, you use the --publish (or -p) option in this format:
docker run \
[OPTIONS]
    -p HOST_ADDRESS:HOST_PORT:CONTAINER_PORT/PROTOCOL
[IMAGE] [ARGUMENTS]
docker run \
[OPTIONS] \
    -p 80:80/tcp \
[IMAGE] [ARGUMENTS]
WDWD:
HOST_ADDRESS:- Optional. By default0.0.0.0. Address to expose the port on the host system.HOST_PORT- Host port to expose the container port on.CONTAINER_PORT- Container port to expose./PROTOCOL- Optional. By defaulttcp. The port protocol, currently can betcporudp.
And that's how you forward/publish ports from the container to the outside.
Running the WordPress instance container
To configure our WordPress container instance, the Docker image comes with extra environment variables.
The WordPress image name is wordpress (Docker Hub Page)
The possible environment variables for the configuration are the following ones:
-e WORDPRESS_DB_HOST=...Defaults to the DNS name or IP address and port of the linked MySQL container, link namemysql.-e WORDPRESS_DB_USER=...Defaults to "root".-e WORDPRESS_DB_PASSWORD=...Defaults to the value of theMYSQL_ROOT_PASSWORDenvironment variable from the linked MySQL container, link namemysql.-e WORDPRESS_DB_NAME=...- Defaults to "wordpress".-e WORDPRESS_TABLE_PREFIX=...- Defaults to "". Only set this when you need to override the default table prefix inwp-config.php.-e WORDPRESS_AUTH_KEY=...,-e WORDPRESS_SECURE_AUTH_KEY=...,-e WORDPRESS_LOGGED_IN_KEY=...,-e WORDPRESS_NONCE_KEY=...,-e WORDPRESS_AUTH_SALT=...,-e WORDPRESS_SECURE_AUTH_SALT=...,-e WORDPRESS_LOGGED_IN_SALT- Set these to a secure random value; in production use different random values per variable.
In the case of the WORDPRESS_DB_HOST, the value would be the name of the link name in the docker run command below. In the case of the below command, the WORDPRESS_DB_HOST would be database.
The command to run the WordPress container is like this:
docker run \
    -d \
    --name wordpress \
    -e 'WORDPRESS_DB_HOST=database' \
    -e 'WORDPRESS_DB_USER=wordpress' \
    -e 'WORDPRESS_DB_PASSWORD=wordpress' \
    -e 'WORDPRESS_AUTH_KEY=wordpress' \
    -e 'WORDPRESS_SECURE_AUTH_KEY=wordpress' \
    -e 'WORDPRESS_LOGGED_IN_KEY=wordpress' \
    -e 'WORDPRESS_NONCE_KEY=wordpress' \
    -e 'WORDPRESS_AUTH_SALT=wordpress' \
    -e 'WORDPRESS_SECURE_AUTH_SALT=wordpress' \
    -e 'WORDPRESS_LOGGED_IN_SALT=wordpress' \
    --link mysql:database \
    -p 80:80 \
    wordpress
WDWD:
-d- To run the container detached.--name wordpress- Gives the container the name "wordpress".-e ...=...- Specifies environment variables, that are used for configuration.--link mysql:database- Creates a "link" namedmysql, from thedatabasecontainer.wordpress- Specifies what image to use.
Now execute the command and you should be able to see the WordPress installation screen at http://127.0.0.1:80/.
NOTE
All data inside the container, will be lost on removal of the container! In our case, we already use volumes, so don't worry.
For cleanup you now stop and delete the container.
To stop the WordPress instance, run docker stop CONTAINER (where CONTAINER in this case is wordpress). After stopping the container, you can remove it with docker rm CONTAINER.
The container has to be stopped, before it can be removed.
Now that we looked into some of most important beginner topics of Docker, we are going to take a look deeper into these topics.
How do you execute a command/shell inside the container?
To execute a command inside the container, after it has been started, for example in the MySQL container for maintenance access.
With our example, MySQL container let's display a list of the existing databases. The command to display the databases from shell is:
mysql -u root -p -e "SHOW DATABASES;"
For this case, the command docker exec is used.
The syntax of docker exec is a bit equal to the of docker run. Running docker exec --help as always to show you the help/syntax menu.
Expected Output
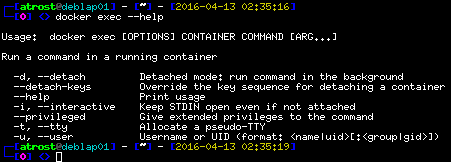
To run a command interactively for example opening an interactive MySQL shell session, the command would be:
docker exec \
    -it \
    CONTAINER \
    mysql -u root -p
WDWD:
-i- Attach the stdin aka interactive.-t- Optional. Allocates a pseudo-TTY (pseudo TeleTYpewriter) to the shell/command run.CONTAINER- Container ID or name of the container the command should be executed in.mysql -u root -p- The command and arguments to execute.
You would use the --detach (or -d) option to run a non-interactive command in the background with no logs or return (Good for cron jobs ;-)).
NOTE
- To be able to run a command in the container, the command/binary/file/whatever has to exist in the container!
Data, Data everywhere
Insert "Data Data everywhere!" buzz lightning meme here
"Volumes" aka Mounts ("Host Path")
Volumes add persistence to your data. When a container is stopped and removed, the data in the container is lost.
With a volume you would mount the part of the data out of the container. For example with our MySQL container, we would mount the container path /var/lib/mysql/ (contains the MySQL databases) somewhere safe.
So if the MySQL server inside the container should ever crash and the container then be terminated, you can just fire up with the docker start command or delete the container and execute the docker run command again. The MySQL container then starts using the data where it exited.
I already showed the option, but here is it again (Long form --volume=):
docker run \
[OPTIONS]
    -v HOST_PATH:CONTAINER_PATH:MODE
[IMAGE] [ARGUMENTS]
WDWD:
HOST_PATH- Path to mount from the host system inside the container.CONTAINER_PATH- "Mount" destination path in the container.:MODE- Is optional. Can berw(read-write) orro(read-only). Defaults torw.
TL;DR Data inside container to outside of container.
NOTE
- When the host path doesn't exist, it'll get created. BUT the permissions will be a bit "freaky".
- When the path doesn't exist and get's created on the host, the directory will be (by default) owned by
root:root, mode permsdrwxr-xr-x.
- When the path doesn't exist and get's created on the host, the directory will be (by default) owned by
- You can now create volumes using the Docker command, but I'm not going deeper into this. You can read more about this here.
Data containers aka --volumes-from
NOTE
- I do NOT recommend this method as I often enough "accidentally" clear all exited/dead containers, so my disk space doesn't run out.
- I also have cron jobs running on my servers, that clean exited containers. Meaning data containers would just get cleared out everytime.
You can store data inside another container, that's called data volume containers.
When creating an image, you can specify those volumes. You create a container that has a volume "built-into" (Specified while the image was built), meaning that assuming it is our MySQL server image the in-built volume would be located at /var/lib/mysql
The data volume container runs "nothing", it is just there for purpose of getting used by another container. For this you change the entrypoint with the following run option --entrypoint=COMMAND (where command could be just /bin/true) so the container stops and doesn't run the program it should.
Now that we would have a data container, we can use the volumes from this container using the --volumes-from=CONTAINER (where CONTAINER is a container name or ID) option.
Let's assume we have a data container, created from the example here, with the volume /data and we have a second container, running the same image, that would save the data to /data.
In this case using the --volumes-from option would write the data inside the first container, the data container.
As I wrote I personally don't recommend and I'm not even using this method, as I find it bad.
Actual "Volumes"
Docker has a way of managing volumes that are with the "default storage" directories on the same server.
To list, create, delete, and manage these volumes you can use the docker volume ls command and the other subcommands (e.g., docker volume --help).
These volumes are persisted across container restarts/deletions, unless the volume is removed (docker volume rm VOLUME_NAME).
For scalable applications storage aka "persistence of data" is important.
Networking
Brace Yourself for container network stuff!
NATing using iptables
I'm not going to explain NAT in detail here.
To badly summarize it, NAT also known as "Network Address Translation", allows multiple devices to share one (public) IP address. This is mainly used with IPv4 based networks, as with IPv6 there's enough IPs available.
Over seven bridges you must go (docker0 bridge and veth interfaces)
Docker creates a bridge interface that is used as a bridge to your network interfaces (eth0, en0, etc.). The bridge Docker creates is called docker0 by default.
By default the docker0 bridge will be assigned the 172.17.0.1/16 IP range as a network. This IP address range will be used, to assign every container a separate IP.
Sometimes the bridge address range needs to be adjusted, in most cases when you are running Docker in a corporate network or the network range is just already in use/allocated.
You would need to add the --bip=192.168.1.0/24 (where 192.168.1.0/24 is an unused IP range) to on Debian based systems to the /etc/default/docker or on RHEL based systems to the /etc/sysconfig/docker or /etc/sysconfig/docker-network.
When a container is created, a veth interface will be created too (depending on the network mode). The veth interface will have an unique name. veth stands for virtual ethernet device. The veth device will "connect" to the bridge, to acquire network connectivity. The veth interface will not show the ip address when using tools like ip addr show or ifconfig.
Example Output
$ ip address show
1: lo: <LOOPBACK,UP,LOWER_UP> mtu 65536 qdisc noqueue state UNKNOWN group default qlen 1000
    link/loopback 00:00:00:00:00:00 brd 00:00:00:00:00:00
    inet 127.0.0.1/8 scope host lo
       valid_lft forever preferred_lft forever
    inet6 ::1/128 scope host noprefixroute
       valid_lft forever preferred_lft forever
2: enp9s0f0: <BROADCAST,MULTICAST,UP,LOWER_UP> mtu 1500 qdisc mq state UP group default qlen 1000
# [...]
8: docker0: <BROADCAST,MULTICAST,UP,LOWER_UP> mtu 1500 qdisc noqueue state UP group default
    link/ether 02:42:c8:3e:85:6a brd ff:ff:ff:ff:ff:ff
    inet 172.17.0.1/16 brd 172.17.255.255 scope global docker0
       valid_lft forever preferred_lft forever
    inet6 fe80::42:c8ff:fe3e:856a/64 scope link proto kernel_ll
       valid_lft forever preferred_lft forever
20: veth8d1ae95@if19: <BROADCAST,MULTICAST,UP,LOWER_UP> mtu 1500 qdisc noqueue master docker0 state UP group default
    link/ether 5e:ca:e7:b8:45:9b brd ff:ff:ff:ff:ff:ff link-netnsid 0
    inet6 fe80::5cca:e7ff:feb8:459b/64 scope link proto kernel_ll
       valid_lft forever preferred_lft foreve
This output shows, the docker0 interface and the veth interface of the database container. In the end we use docker inspect CONTAINER to get the IPAddress of the container.
Docker has the feature to even create an overlay network, between multiple machines. But I'm not going deeper into this. For people interested in this feature, see the Docker docs here (Docs Docker network create).
Network "modes" ("default", host or other)
I've wrote, that I'm not going deeper into Docker's "own" (overlay) network feature, but with this topic, I'll have to go into it just a bit.
When running a container the default network "mode" is named default (--net=default). The default network "mode" creates a separate network stack for every container.
There is also the network "mode" host available by default. The host network "mode" gives the host network stack aka "full access to the network of the host system" inside the container.
This can be a huge security risk! When a container has
The network "mode" can be also the name of an (overlay) network created using the Docker "client" (engine).
Example Output
$ docker run -it docker.io/library/busybox:latest sh
Unable to find image 'busybox:latest' locally
latest: Pulling from library/busybox
2fce1e0cdfc5: Pull complete
Digest: sha256:c230832bd3b0be59a6c47ed64294f9ce71e91b327957920b6929a0caa8353140
Status: Downloaded newer image for busybox:latest
/ # ip l
1: lo: <LOOPBACK,UP,LOWER_UP> mtu 65536 qdisc noqueue qlen 1000
    link/loopback 00:00:00:00:00:00 brd 00:00:00:00:00:00
17: eth0@if18: <BROADCAST,MULTICAST,UP,LOWER_UP,M-DOWN> mtu 1500 qdisc noqueue
    link/ether 02:00:00:11:00:00 brd ff:ff:ff:ff:ff:ff
/ # ip a
1: lo: <LOOPBACK,UP,LOWER_UP> mtu 65536 qdisc noqueue qlen 1000
    link/loopback 00:00:00:00:00:00 brd 00:00:00:00:00:00
    inet 127.0.0.1/8 scope host lo
       valid_lft forever preferred_lft forever
17: eth0@if18: <BROADCAST,MULTICAST,UP,LOWER_UP,M-DOWN> mtu 1500 qdisc noqueue
    link/ether 02:00:00:11:00:00 brd ff:ff:ff:ff:ff:ff
    inet 172.17.0.2/16 brd 172.17.255.255 scope global eth0
       valid_lft forever preferred_lft forever
/ # exit
In the output, you can see that when using the default network mode you'll get a "newly" created network stack and when using the host network mode, the container gets the hosts network stack.
Publishing ports
When using the default network mode, Docker creates iptables rules so published/forwarded ports are reachable from the outside.
In the example, we see the iptables rules for a container with published port 80/http.
Example Output
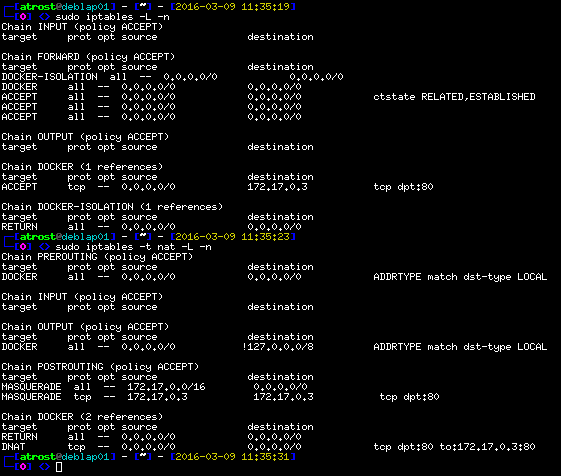
As we can see Docker uses a separate DOCKER chain in the FORWARD chain, to map incoming traffic on port 80 to the container IP.
After the destination IP has been changed, Docker uses DNAT (Destination Network Address Translation), to "map" the traffic to the container's end address.
TASK network101
You can use the script show_me_the_network.sh from task network101, to view your network interfaces and current iptables rules.
Looking into your network
Before we dive into the network, the tool (scope) used in this section might not fully work anymore depending on your Docker version. The reason for this is that "Weave Works", the company behind the scope project, has shut downed a few years ago..
TASK network101
Do you want to visualize your container network situation? Yes? Then one available tool is Weave Scope.
In the network101 task is a file called start_weave_scope.sh. The script downloads the Weave Scope wrapper script, that starts the containers needed for Weave Scope to function.
The commands that are used to download the Weave Scope wrapper script are:
sudo wget -O /usr/local/bin/scope https://git.io/scope
sudo chmod a+x /usr/local/bin/scope
sudo scope launch
After the image of the container has been pulled and started, you can then navigate to http://localhost:4040 to see the Weave Scope UI.
Expected Output
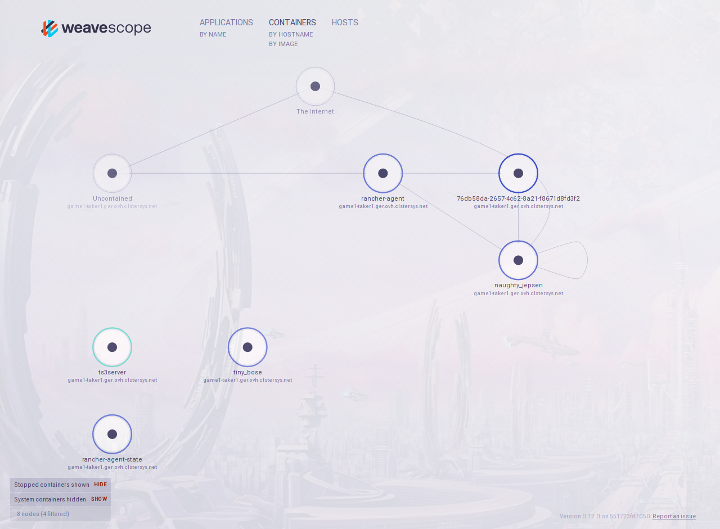
Through the Weave Scope UI you gain an immersive insight into your network of the containers.
Due to the closure of "Weave Works", nowadays other tools based on "new kernel technologies" (eBPF) have taken the place, one of them is Cilium CNI.
Limiting container resources
"It's OK I know my limit"
- said the rogue process
As I already mentioned in the Container!? part, namespaces can be used to limit the resources available to the processes, etc., in it.
CPU Limit
Limiting the precious computing resource of a container.
$ docker run --help
[...]
  --cpu-period                    Limit CPU CFS (Completely Fair Scheduler) period
  --cpu-quota                     Limit CPU CFS (Completely Fair Scheduler) quota
  --cpuset-cpus                   CPUs in which to allow execution (0-3, 0,1)
[...]
You can limit the time period and the quota of the CFS (Completely Fair Scheduler).
Limiting a container to specific cores is also possible (--cpuset-cpus).
Memory and Swap Limit
$ docker run --help
[...]
  --cpuset-mems                   MEMs in which to allow execution (0-3, 0,1)
[...]
  --kernel-memory                 Kernel memory limit
[...]
  --memory-reservation            Memory soft limit
  --memory-swap                   Swap limit equal to memory plus swap: '-1' to enable unlimited swap
  --memory-swappiness=-1          Tune container memory swappiness (0 to 100)
[...]
  --oom-kill-disable              Disable OOM Killer
  --oom-score-adj                 Tune host's OOM preferences (-1000 to 1000)
[...]
As you can see, there is a good amount of option to play around with the memory a container can use and how it can use the memory.
A good feature if you have limited memory available is to play with the memory swappiness.
The OOM (Linux Out of Memory Management) options are good, if you have memory intensive applications, but only limited memory available. So important application container don't get killed, when the system should run out of memory.
Other Limits
There are other options for limiting resources of a container/namespace available, though for this workshop they are out of scope. E.g., disk read/write IO, GPUs.
"Selfies? I mean Images"
An image is the core of a container. Without an image, there would be no container. Creating images is simple to do, depending on what you try to "containerize". In this part we set a simple goal. Our goal is to create a container that runs nginx in it.
Image Names explained
Images that "come" from the Docker Image Hub, don't need a repository specified.
The image we used for the MySQL container is:
docker.io/library/mysql:latest
WDWD:
library- The username of the creator. Please note that on Docker Hub thelibrary"user" is for official images.mysql- The name of the image.latest- The "version" tag. The tag can be anything, but emojis.
An example for an image that is pulled from a different image server, than the official Docker Hub, is my image for Zulip by Dropbox that is hosted on quay.io.
quay.io/galexrt/zulip:1.3.10
SERVER/USERNAME/IMAGE_NAME:TAG
WDWD:
quay.io,SERVER- Defaults todocker.io. The image repository server to pull the image from.galexrt,USERNAME- Username of the image creator/uploader.zulip,IMAGE_NAME- Name of the image.1.3.10,TAG- Like git tags. When not specified, the default islatest(which is not good).
In the case of official created images, like the WordPress image we used no server and username is required (by default). Official images are "marked" through the "missing" username in the image name and the Docker Image Hub url having an underscore instead of an username (https://hub.docker.com/r/_/wordpress/).
What have Layer Cakes to do with Docker Images?

Mhh, tasty, isn't it? But now back to the topic.
TASK: dockerfile101
In the Docker universe, a Docker image is built from the bottom to the top like a cake, the bottom is a baseimage (or any other image as a base). Every "new" layer on top of it, is an action that had been run when building the image.
Meaning if we create an image from the "baseimage" fedora:23 like the example Dockerfile, a cross-section/profile would look like this:
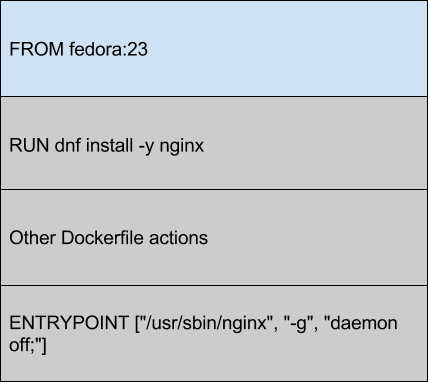
That is one of the reasons, why Docker images are so small. If you download 10 images that are based on debian:jessie, you would only have to download the created/modified layers, because the baseimage is the same for these 10 images.
To build/create an image, you create a Dockerfile and that's what we are going to talk about next.
Dockerfile Examples
As you may have already seen in the task directory dockerfil101, there was a file called Dockerfile.
A Dockerfile contains build instructions for an image. Dockerfiles use a "special" syntax. The syntax in itself is not too hard to understand but can be hard to read in more advanced use cases.
I'm going to show you a simple and a more advanced example of Dockerfiles.
"Simple" Real World Dockerfile Example
Taken from the carazzim0/docker-ebot GitHub project, file Dockerfile.
FROM docker.io/library/debian:jessie

ENV EBOT_HOME="/ebot" TIMEZONE="Europe/Berlin"

COPY entrypoint.sh /sbin/entrypoint.sh

RUN apt-get update && \
    apt-get -y upgrade && \
    apt-get clean && \
    apt-get -y install nodejs npm curl git php5-cli php5-mysql screen git && \
    apt-get clean && \
    sed -i "s~;date.timezone =~date.timezone = $TIMEZONE~g" /etc/php5/cli/php.ini && \
    /bin/ln -s /usr/bin/nodejs /usr/bin/node && \
    curl -sS https://getcomposer.org/installer | php -- --install-dir=/usr/bin && \
    mkdir "$EBOT_HOME" && \
    git clone https://github.com/deStrO/eBot-CSGO.git "$EBOT_HOME" && \
    cd "$EBOT_HOME" && \
    git checkout "master" && \
    /usr/bin/php /usr/bin/composer.phar install && \
    npm install socket.io formidable archiver

COPY Match.php $EBOT_HOME/src/eBot/Match/Match.php

VOLUME ["$EBOT_HOME/demos", "$EBOT_HOME/logs"]

EXPOSE 12360 12361

ENTRYPOINT ["/sbin/entrypoint.sh"]
Advanced Dockerfile Example
Old copy from my previous galexrt/docker-zulip GitHub project, file Dockerfile.
FROM quay.io/sameersbn/ubuntu:latest

ENV ZULIP_VERSION="master" DATA_DIR="/data"

COPY entrypoint.sh /sbin/entrypoint.sh

RUN apt-get -q update && \
    apt-get -q dist-upgrade -y && \
    apt-get install -y git && \
    mkdir -p "$DATA_DIR" /root/zulip && \
    git clone https://github.com/zulip/zulip.git /root/zulip && \
    cd /root/zulip && \
    git checkout "$ZULIP_VERSION" && \
    rm -rf /root/zulip/.git

COPY custom_zulip_files/ /root/custom_zulip

RUN cp -rf /root/custom_zulip/* /root/zulip && \
    VOYAGER_CLASS="dockervoyager" DEPLOYMENT_TYPE="dockervoyager" ADDITIONAL_PACKAGES="python-dev python-six python-pbs" \
    /root/zulip/scripts/setup/install && \
    wget -q https://www.zulip.com/dist/releases/zulip-server-latest.tar.gz -O /tmp/zulip-server.tar.gz && \
    tar xfz /tmp/zulip-server.tar.gz -C "/home/zulip/prod-static" --strip-components=3 --wildcards */prod-static/serve && \
    rm -rf /tmp/zulip-server.tar.gz && \
    ln -nsf /home/zulip/deployments/current/prod-static/serve /home/zulip/prod-static && \
    apt-get -qq autoremove --purge -y && \
    apt-get -qq clean && \
    rm -rf /root/zulip/puppet/ /var/lib/apt/lists/* /tmp/* /var/tmp/*

COPY setup_files/ /opt/files
COPY includes/supervisor/conf.d/zulip_postsetup.conf /etc/supervisor/conf.d/zulip_postsetup.conf
COPY includes/createZulipAdmin.sh /createZulipAdmin.sh

VOLUME ["$DATA_DIR"]
EXPOSE 80 443

ENTRYPOINT ["/sbin/entrypoint.sh"]
CMD ["app:run"]
Don't worry we're going to start with a simple and basic image to learn everything we need to know. ;-)
Understanding Dockerfiles
TASK: dockerfile202
TIP: If you have trouble writing a Dockerfile, checkout the Dockerfile reference Docs.
You will create an image with nginx installed (You can later expand it, with more functionality, like with PHP-FPM).
To guide you in creating a nginx image, I show you an example of a http webserver application written in golang, before you are going to create your own nginx image.
Golang Dockerfile Example:
# Official golang image where the "workspace" (GOPATH) is configured to be at `/go`
FROM docker.io/library/golang:1.22.7
# Set the working directory
WORKDIR /usr/src/app
# Copy the code into the container
COPY . ./
# Build the code inside the container
RUN go build .
# Specify the entrypoint of the container
ENTRYPOINT ["/usr/src/app/dockerfile202"]

# HTTP server listens on tcp port 8080.
EXPOSE 8080
WDWD:
FROM ...- Use an image as the base.COPY ... ...- Copy files from the build root.ADD ... ...- Same asCOPY, but target can be "online" (e.g., an URL) and if it is an archive, it will be extracted. This has it's up and downsides, please make sure to check, e.g., to gain a deeper understanding of the differences.- To quote the blog article from "phoenixnap.com": "The
ADDcommand use is discouraged for all cases except when the user wants to extract a local compressed file. For copying remote files, the run command combined with wget or curl is safer and more efficient. This method avoids creating an additional image layer and saves space."
- To quote the blog article from "phoenixnap.com": "The
RUN ...- Run commands (Shell used/bin/sh).ENTRYPOINT ["..."]- The command to execute when the container is started.CMD ["..."]- Arguments for theENTRYPOINT, most images will execute .EXPOSE 8080 ...- Expose a port when linked. To specify the protocol just add/tcpor/udpat the end of the port number.
There's even the possibility, to execute specific commands when the image is used as a base image, the base instruction is called ONBUILD ..., but explaining this is beyond the scope at this time.
To build an image we use the docker build command. Building this golang example image, we run the following command:
docker build -t dockerfile202 -f Dockerfile .
WDWD:
build- Used to build Docker images.-t IMAGE_NAME- Specify the name (with an optional tag) of the image, you are creating (Optional. NOTE This options is important when manually building and pushing a Docker image to a repository).IMAGE_NAMEis a string name for the image with an optional tag specified. The tag is added by adding double dots like this:TAG_NAME.-f DOCKERFILE- Set the location of theDockerfile(Optional)..- The image build root of the image build (Important whenADDorCOPYis used in theDockerfile). All files will be at least added to the build environment for easy access, but not added to the image itself.
As you can see, it isn't that hard to build an application inside a container.
Let's run the container and check that it is working:
docker run \
    -d \
    --name=dockerfile202 \
    -p 8080:8080 \
    dockerfile202
Open your browser and go to http://localhost:8080/hello. You should see a basic page with the text on it:
Hello Gopher I am a simple application that displays this web page built inside a container.
To stop the container run docker stop dockerfile202.
Multi-Layered Madness
TASK: dockerfile303
For security and cleanliness of the build environment one can use multi-layer builds to build the application in a container and copy the output into the "end/final image" produced by the Dockerfile.
To improve the previous example of a Golang application, one could rewrite the Dockerfile to be like this:
# This is the first "image" we use and name it "builder"
FROM docker.io/library/golang:1.22.7-alpine3.20 AS builder
# Set the working directory
WORKDIR /usr/src/app
# Copy the code into the container
COPY . ./
# Build the code inside the container
RUN go build .

# This would be "final" image
FROM docker.io/library/alpine:3.20.3
WORKDIR /app
# Copy the built binary from the builder image inside the "final" image
COPY --from=builder /usr/src/app/dockerfile303 /usr/local/bin/
# Specify the entrypoint of the container
ENTRYPOINT ["/usr/local/bin/dockerfile303"]

# HTTP server listens on tcp port 8080.
EXPOSE 8080
WDWD:
FROM ... AS __NAME__- Use an image as the base and give it a name. Giving it a name is optional but recommended for readability and especially for multi-layered container builds.COPY --from=__NAME__ SRC DEST- Copy a file from
Again to build the image we use the docker build command. Building this multi-layered golang example image:
docker build -t dockerfile303 -f Dockerfile .
It should yield the same output as before, but let's look at the size of the container image.
To check the image size run docker images.
$ docker images
This means that in case an attacker gains access to the container via an, e.g., exploit in the application code, the attacker would not have the whole Golang build and development tools available to them.
Let's run this container and check that it is working:
docker run \
    -d \
    --name=dockerfile303 \
    -p 8080:8080 \
    dockerfile303
Open your browser again and go to http://localhost:8080/hello. You should see a basic page with a different text on it now:
Hello Gopher I am a multi layered built image.
To stop the container run docker stop dockerfile303.
To improve security even further, one might want to change the docker.io/library/alpine base image of the "final" image to be scratch, which we'll go into after we have tested our built image. This is something we'll talk about later further.
Base image: scratch that!
The scratch "image" can be used for creating minimal container images containing only the things that the application needs. In Golangs case, it is quite easy as the build result is just one binary (that can even be statically compiled).
For a more complex application, e.g., written using Java Springboot, I would recommend checking out the official documentation to see if there are recommendations available.
Especially for Springboot based applications, there is tooling available to easily package your application as a (minimal) container image.
For more information on the scratch image check out the "Create base image" Docker docs.
Commands you need to know when working with Docker images
Deleting a Docker image
To delete a Docker image, you use the docker rmi subcommand. The syntax is the same as for the docker rm subcommand.
docker rmi IMAGE [IMAGE...]
WDWD:
rmi- The subcommand for deleting one or more image(s).IMAGE [IMAGE...]- One or more image names or IDs to delete.
Build a Docker image from Dockerfile
Use this command to build images.
docker build -t IMAGE_NAME -f DOCKERFILE BUILD_PATH
WDWD:
build- The build subcommand.-t IMAGE_NAME- More details toIMAGE_NAMEare going to be explained in a later section, here or see above WDWD part.DOCKERFILE- Path to a Dockerfile. Defaults to the current work directory withDockerfileattached as a file name.BUILD_PATH- The build root path. Files in the directory will be added to the Docker build environment, but not to the image itself. The files are only added when the specified Dockerfile has instructions to do so. You can't go higher than theBUILD_PATH(e.g., if theBUILD_PATHis.(current directory/my-project/), you can't access files that are in your home directory/home/your-name)!
Let's build your first own Dockerfile
Now that we know some Dockerfile basics, we can start building our own nginx image from the baseimage debian:jessie.
Let's make this like a test in the school, replace all __BLANK__ with the correct answer (Solutions are here):
FROM __BLANK__

RUN __BLANK__

ENTRYPOINT ["__BLANK__"]
Got all blanks filled out? Good. Let's build the image:
docker build -t workshop-nginx .
Expected Output of docker build -t workshop-nginx .
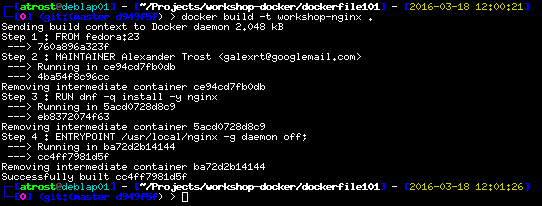
The build should go successfully, when you filled in the blanks correctly. Let's run the image to see if it is working, the container name will be workshop-nginx:
docker run \
    --name workshop-nginx \
    -d \
    -p 80:80 \
    workshop-nginx
If you did something wrong, remove the container using (where CONTAINER_NAME is a container ID or name):
docker rm CONTAINER_NAME
To check if the container is running with your image, run docker ps -a.
WDWD:
ps- Like thepscommand, but for the containers.-a- Show all containers, whether their current state, without it showing only running containers.
You should see that the container you started, has exited.
There's a simple reason, why the container exited/stopped. When running a command as the entrypoint, it has to stay running, not fork to background. When the process forks to background, Docker will think the process has stopped and the container status will be set to exited with the last return code.
That's why we need to tell nginx, not to run as a daemon, not fork to background, with the following additional arguments "-g", "daemon off;" (these arguments must be added to the ENTRYPOINT line of the Dockerfile).
So we could make a change to the nginx.conf, overwrite nginx.conf with a custom one or just change the ENTRYPOINT line to make it look like this:
ENTRYPOINT ["nginx", "-g", "daemon off;"]
Let's rebuild the image (same command) and run it again. Open http://127.0.0.1:8080 in your browser and voilà it should show the nginx default page.
To go further with your created image, let's "mount" a volume inside the container with our own index.html.
Use the index.html from task dockerfile202 or create one yourself.
Now we add a volume to the container. Add -v "$(pwd)":"/usr/share/nginx/html" to the docker run command, but don't forget add the argument before the image name (in this case the image is workshop-nginx).
Your command should look like this:
docker run \
    --name workshop-nginx \
    -d \
    -p 8080:80 \
    -v "$(pwd)":"/usr/share/nginx/html" \
    workshop-nginx
WDWD:
-v HOST:CONTAINER_PATH- Mount a path from the host into the container, or in the format of-v VOLUME_NAME:CONTAINER_PATHto use a volume (the volume must exist already,docker volume ls)
This starts a container named workshop-nginx running the image workshop-nginx with a volume mounted at /usr/share/nginx/html.
If we now open http://127.0.0.1:8080 in the browser, we will see our index.html. Well done!
How can this help in the development workflow?
If you are for example creating a new CMS written in PHP you could, create a Docker image for it. On every push to the git repository of the project, the image could be built and automatic checks could be run, to ensure every feature is working fine.
For example Travis CI has switched big parts of their build infrastructure to Docker containers. Quoting Travis CI some headings from their blog post:
Builds start in seconds Faster builds More available resources in a build container Better network capacity, availability and throughput Easier to scale
As we can see, containers are better than VMs (depending on the application area).
The lower resource usage is good for the development workflow, making it cheaper and faster.
Readying for Production
Dockerfile HEALTHCHECK directive can be used to specify a, as the name implies, health check for the container. It can be useful when used in the right way.
HEALTHCHECK --interval=5m --timeout=3s \
  CMD curl -f http://localhost:8080/ || exit 1
A recommendation to strengthening your applications for production is to take the The Twelve-Factor App list into account when designing your applications.
Composing containers made simple with docker-compose
Making multi container applications simpler to start
To remove the process of typing all those commands to start the containers, docker-compose has been created.
docker-compose makes it easy peasy lemon squeezy to run one to many containers using one command.
The syntax of a docker-compose.yml is YAML (YAML Ain't Markup Language). A good syntax checker, I use, is available here.
In our example with WordPress we will create a docker-compose.yml for our MySQL database server, WordPress instance and as an extra we'll add phpMyAdmin to it.
Create the docker-compose.yml file. I made this part like a test again, so you can see where you have knowledge holes, replace all __BLANK__ with the correct answer (Solutions are here):
(This docker-compose.yml has been taken from https://www.digitalocean.com/community/tutorials/how-to-install-wordpress-and-phpmyadmin-with-docker-compose-on-ubuntu-14-04) and modified for this task.
version: "3.5"
services:
  # mysql image configuration see https://hub.docker.com/_/mysql/
  mysql:
    image: docker.io/library/mysql:latest
    environment:
      MYSQL_ROOT_PASSWORD: my-scret-pw
      MYSQL_DATABASE: wordpress
      MYSQL_USER: wordpress
      MYSQL_PASSWORD: wordpress
    volumes:
      - "mysql:/var/lib/mysql:rw"
  # wordpress image configuration see https://hub.docker.com/_/wordpress/
  wordpress:
    image: wordpress
    ports:
      - 8080:80
    environment:
      WORDPRESS_DB_HOST: __BLANK__:3306
      WORDPRESS_DB_NAME: __BLANK__
      WORDPRESS_DB_USER: __BLANK__
      WORDPRESS_DB_PASSWORD: __BLANK__
      WORDPRESS_AUTH_KEY: SECURE_AUTH_KEY
      WORDPRESS_LOGGED_IN_KEY: SECURE_LOGGED_IN_KEY
      WORDPRESS_AUTH_SALT: SECURE_AUTH_SALT
      WORDPRESS_LOGGED_IN_SALT: SECURE_LOGGED_IN_SALT
    volumes:
      - wordpress:/var/www/html
  # phpmyadmin image configuration see https://hub.docker.com/r/phpmyadmin/phpmyadmin/
  phpmyadmin:
    image: phpmyadmin/phpmyadmin
    ports:
      - 8181:80
    environment:
      PMA_HOST: mysql
      PMA_USER: root
      PMA_PASSWORD: workshop

volumes:
  mysql:
  wordpress:
WDWD:
services- List of "service" containers.mysql:- Name of the container.image:- Defines the used image for the container.links: []- A list of container links.ports: []- A list of published ports.
environment: []- "Hash" list of environment variables (Format:NAME: VALUE).
volumes:- List of volumes to create.
Starting our multi container applications with one command
TASK: compose101
To "run"/start the content of our docker-compose.yml, we run:
docker-compose -f DOCKER_COMPOSE_YML up
WDWD:
docker-compose- Thedocker-composecommand.-f DOCKER_COMPOSE_YML- Optional. Defaults todocker-compose.yml.DOCKER_COMPOSE_YMLis a path to a validdocker-composefile.up- Starts the containers defined in the given docker-compose file.
After running the command, you should see log output starting to fill your terminal. To stop the started containers press CTRL+C.
For running the containers detached in the background, you use the same option as for Docker, the --detach (or -d) option.
Basic docker-compose commands
There are some docker-compose commands you should know when working with the docker-compose command.
Stopping all containers run by the current docker-compose file
Instead of the up, you just put stop there. Stops the containers from the current docker-compose file.
docker-compose stop -t TIMEOUT
WDWD:
stop- Stop subcommand.-t TIMEOUT- Optional. Timeout to wait for the containers, before the containers get killed.
Deleting all containers run by the current docker-compose file
Replacing the up with rm, deletes all containers that are started by the current docker-compose file, but now are stopped or exited.
docker-compose -f DOCKER_COMPOSE_YML rm -f
WDWD:
rm- "Subcommand" for removing/deleting all container started by the current selecteddocker-composefile.-f- Optional. Forces the removal of the containers.
Restarting all container started by the current docker-compose file
Restarts all containers that are started or have exited by the current docker-compose file.
This just stops and starts the containers again and not stops, deletes and runs the containers again.
docker-compose -f DOCKER_COMPOSE_YML restart
WDWD:
restart- "Subcommand" for removing/deleting all container started by the current selecteddocker-composefile.
Let's play more with docker-compose!
TASK: compose202
The task contains other docker-compose.ymls for you to play around with. Look at the docker-compose.ymls and start them.
Just play around with docker-compose a bit.
TIP: Keep the -f DOCKERFILE option in mind, when dealing with multiple docker-compose.yml's in one folder.
Summary of these sections
We can now write basic docker-compose.ymls. We can now start a multi container application with one single command.
What to watchout for and what to keep in mind?
Images
- Don't use the
latesttag for container images!- A fully qualified tag is vital to have a reproducible container image build.
- Use fully qualified base image names, instead of, e.g.,
debian:bookworm, usedocker.io/library/debian:bookworm.- Why? Because some container runtimes might have a different default registry configured or none at all.
Containers
- Make sure to set resource "requests"/limits according to the application running in the container.
- E.g., Java applications might need more memory on start but while running, so it can be a good idea to set a lower soft limit (request), than the hard limit.
- Least privileges for containers and the application running inside it.
Docker Compose
- There are different versions of
docker-composefiles in the wild, make sure to keep that in mind when adjusting/updating existingdocker-composefiles (history and development ofdocker-compose). - Very useful tool for development environments, e.g., a MySQL database, Redis server are needed to run some local tests.
Storage
- If you have to persist data, use
docker volumes. Don't use container's as volumes (--volume-from). - Make sure that important data is taken care of, e.g., backups configured. It needs to be clear who is in charge of the data.
Security
- Least privileges for containers and the application running inside it ("duplicate").
- "This container image I downloaded needs
--privilegedto run", don't do it unless you trust the source of the container image and you are sure that the application in it really needs basically full access to the host.
- "This container image I downloaded needs
- Use security scanners/tooling for your container images, to make sure your security team won't lose their hair.
- Don't just run any publicly available container images!
Orchestration Tools
The right tool for the right workload. Keep that in mind or you'll have problems soon.
"A wild Docker Swarm appeared. Kubernetes used rolling-update. It was very effective."
The choice of the orchestration tool, depends on many factors:
- Workloads you'll handle (how many containers will be run?)
- How much traffic?
- Depending on your experience with the tools, stateless or stateful applications?
- How many servers?
My personal favorite choice is Kubernetes, "easy to use", developed by Google (one of the largest and longest container users) and the huge growing community. With the latest updates as well, it can scale up to 1000+ nodes. I like Kubernetes more, because it offers me to start small and scale fast if needed.
That's not the only reason, but one of the biggest why.
Other Orchestration Tools
- Kubernetes
- Mesos by Apache
- Nomad by Hashicorp
- Rancher by Rancher Labs
- Shipyard by the Shipyard team
- And many more..
The End
If you are reading this, you have made it to the end. Well done, madame or sir! Have a cookie and a warm chocolate on my cap. ;-)
Solutions for "Tasks"
nginx Dockerfile
FROM docker.io/library/debian:jessie

RUN apt-get update && apt-get install -y nginx

ENTRYPOINT ["nginx"]
WordPress and MySQL docker-compose.yml
version: "3.5"

services:
  mysql:
    image: docker.io/library/mysql:latest
    environment:
      DB_NAME: wordpress
      DB_USER: wordpress
      DB_PASS: wordpress
    volumes:
      - "mysql:/var/lib/mysql:rw"
  wordpress:
    image: docker.io/library/wordpress
    ports:
      - 8080:80
    environment:
      WORDPRESS_DB_HOST: mysql:3306
      WORDPRESS_DB_NAME: wordpress
      WORDPRESS_DB_USER: wordpress
      WORDPRESS_DB_PASSWORD: wordpress
      WORDPRESS_AUTH_KEY: SECURE_AUTH_KEY
      WORDPRESS_LOGGED_IN_KEY: SECURE_LOGGED_IN_KEY
      WORDPRESS_AUTH_SALT: SECURE_AUTH_SALT
      WORDPRESS_LOGGED_IN_SALT: SECURE_LOGGED_IN_SALT
    volumes:
      - wordpress:/var/www/html
  phpmyadmin:
    image: docker.io/phpmyadmin/phpmyadmin
    ports:
      - 8181:80
    environment:
      PMA_HOST: mysql
      PMA_USER: root
      PMA_PASSWORD: workshop

volumes:
  mysql:
  wordpress: